Creating projects - a How To guide
You can create a new project in the Settings tab. See the Setting your work context How To guide for general info about your project context. This guide deals with the specifics of creating a new project.
A project is created within your currently selected unit. You can only do this in your own personal unit within the Default organisation or within a unit of another organisation if you are an owner of that unit. The organisation owner needs to make you a member of the unit. You do not need to be a member of a unit in order to use a project in that unit. The owner of the project can add you as an administrator, editor or observer of the project to give you write access to the project and you will have observer access to any public projects in the unit.
The Create Project button will be present in the Context section of the Settings panel if you are able to create a project in the current context. If you click on this you get a dialog that lets you specify the project details.
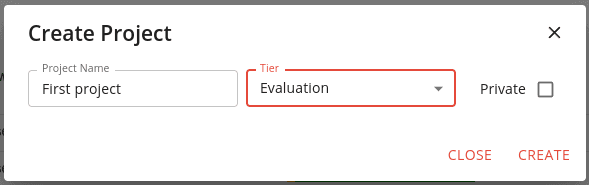
You need to give your new project a sensible name, choose which tier of project you want and whether you want the project to be public or private (Evaluation tier projects cannot be private).
The different tiers are described in the Concepts guide.
Once you have made your choices click on the CREATE button to create your project. Remember that the owner of the unit is responsible for the costs of your project. In the case of a personal unit in the Default organisation that means you!
You can add additional users to your project. These can either be as administrator, editor or observers.
The roles are as follows:
- creator - the person who created the project and can perform administrative operations on it. Only this person can delete the project.
- administrator - can administer the project in the same way as it's creator, except that they cannot delete the project. A project can have multiple administrators.
- editor - can use the project and modify the data in it. they can run apps and jobs in the project.
- observer - can view the contents of the project, but cannot make any changes to the data or execute apps or jobs.
To add or remove users to your project click the edit button in the action to the right of your project listing and add the users you want to the Administrators, Editors and Observers sections. You can also change the privacy of the project with this dialog.